If you decide to print a list of multiple properties (items) found, you have a number of formatting options.
If you are in Table View with a list of properties displayed in the right main window, click on the Print View button to change the view or select Print View from the drop down menu located directly below the Quick Search box in the upper left hand corner of the screen. The drop down menu is shown here ...
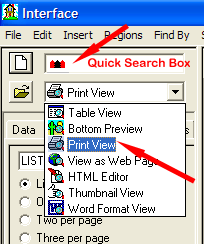
Once selected the view will change in the right main window to
display the default view
![]() designated on the Layout
tab for Print view.
designated on the Layout
tab for Print view.
In this example we have List Format set as our default view.
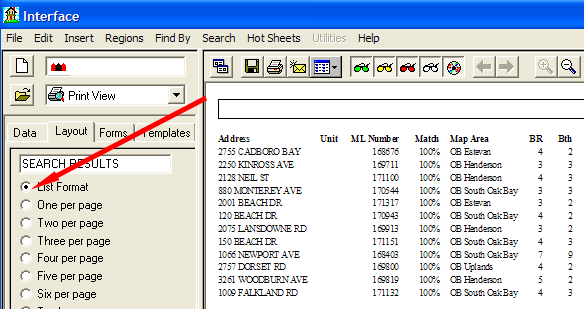
Printing in List Format:
Selecting List Format, will automatically change the Page orientation from Portrait to Landscape.
When you print list format, you cannot control the size of the font directly. The font is sized base on the width of the paper, the total number of columns you are printing (and their widths) and the width of the font you have selected. For best results, use Landscape page orientation, avoid printing columns you do not need by deleting those columns, and use a tall narrow font.
Fonts may be changed from the Layout tab.
To change from List Format to
One per page to
Two per page
to Three per page
- simply click on
the radio ![]() button to change it to
button to change it to
![]() .
.
As you click through the selections the right main view will display your choice.
In this example we have Five per page selected.
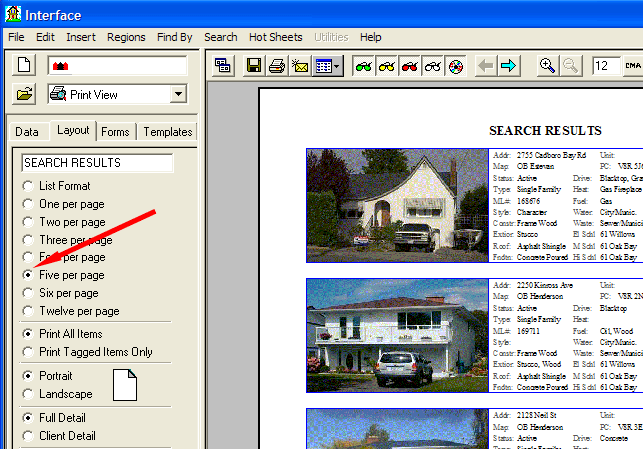
To set the default view for Print View, select the Set as default layout for this view box and then click on the Apply button at the bottom of the left window and the next time you change to Print View your right main window will open in the default view of your choice, until you decide to change it.
Changing Printers:
You can print to any installed printer or directly to fax (if it is installed).
To select a printer click the Print button. The standard Print
window will be displayed like this:
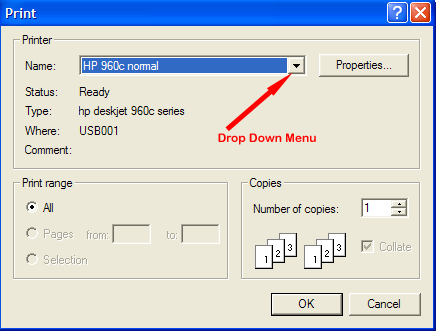
The current printer is displayed.
You can use the Print window to change printers by selecting the desired printer (or fax) from the drop down menu. Once you have selected the printer to use click OK and you print job will be sent to the printer. If the printer you need is not in the list, you will have to install it. You can also use the Properties... button to gain access to more advanced printer options and settings (such as print quality).
Note: INTERFACE™ only supports 8.5 x 11 inch paper size and Landscape format is only supported if you are printing in List Format. All printers that can be installed in Windows® are supported.
Printing only certain listings in a list:
If you do not want to print all of the listings, but only some of them, then tag the
listings you want to print before you click the
![]() button.
You can tag several listings with a shift+click
or ctrl+click. Then select
"Print Tagged Items Only" as shown ...
button.
You can tag several listings with a shift+click
or ctrl+click. Then select
"Print Tagged Items Only" as shown ...
Changing the Page Title (or header):
If you are printing other than "One per page" you can insert a page title. Type the title you want to use in the display as shown ...
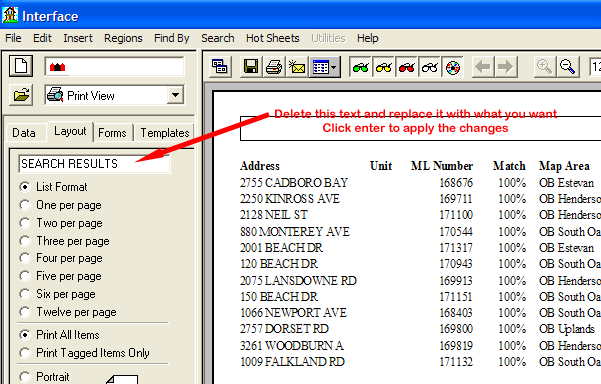
The display currently shows "SEARCH RESULTS". Type in the text you want and then click enter. The new page title will be displayed at the top of each page.

If you want to change page titles within the list. Print your list as several sub-lists by tagging some of the listings. You could do this with a shift+click for example.
Your page title becomes the title for the list. It is used in printing, for generating file names for the list, and for display in the title bar of floating lists. A list name is generated automatically and can be changed in the "Print" window or by right clicking the title bar of a floating list and choosing "Rename List".
Printing Only "Client Detail":
You can switch from "Full Detail" to "Client Detail" in order to access a set of templates better suited for the general public. These templates exclude certain fields of information such as commission information, tenants numbers, etc.
Note: If there are no "Public" version templates in the "Client Detail" folder(s) the program will default to the "Full Detail" template of the same name.