INTERFACE™

How to Create a File

INTERFACE™
|
 |
This page describes how to create a file on your hard drive.
THIS PAGE CONTAINS INFORMATION THAT IS VERY IMPORTANT. READ IT CAREFULLY.
When you save something on the computer, you create a file on your hard drive. The most difficult thing about saving anything on a computer is not the saving itself, rather it is understanding where (on your hard drive) you are creating the file, so when you go back to find it again you know where to look. Many new users have explained to me that they are sure that they saved it, but now they cannot seem to get it back. Naturally I ask them if they know where they saved it. If they say Huh, I know we are in trouble. Until you understand the folder structure on your hard drive you won't have any real idea where you should (or even could) save a file, so you should refer to that page first. As long as you know where you have saved something using INTERFACE™, it is really simple to get it back no matter what type of object you have saved. On the other hand if you haven't a clue where you saved it, good luck at finding your 20,000 or so bytes on your 2,000,000,000 byte hard drive.
When you save items using a program such as INTERFACE™ you will be able to open those items again using that same program. Sometimes you might be able to open these same items in a different program. For example the HTML files saved by INTERFACE™ can be opened by Microsoft Internet Explorer. In general this is NOT the case. When you save information it is encoded into zillions of binary magnetic pulses on your hard drive. Usually only the program that encoded the information will know how to decode it. Occasionally if it is encoded in a standard format other programs will be able to decode it also. Only the files saved by INTERFACE™ in a standard format may be opened by other programs. Some formats used by INTERFACE™ are standard, others are not. The format of a file is designated by that part of the file name following the dot, so the operating system knows which program(s) can open that type of file.
| STANDARD FILE FORMATS USED BY INTERFACE™ | |
| HTML | Hyper Text Markup Language - Used by Web Browsers such as Microsoft Internet Explorer |
| JPG | Joint Photographic Experts Group - Compressed Photo Files used by most MLS® programs and elsewhere |
| BMP | Bit Map - Uncompressed Photo Files used by Microsoft Paint |
| DOC | Document - Formatted text with embedded pictures used by Microsoft Word |
| TXT | Text - Unformatted text used quite universally and typically required for data export |
| PUB | Publisher - Formatted layout used by Microsoft Publisher |
| EXE | Executable - Application program used in a Microsoft Operating System |
| DLL | Dynamic Link Library - Shared Application Extensions used in Microsoft Windows |
| NON-STANDARD FILE FORMATS UNIQUE TO INTERFACE 2000 | |
| Saved Column Arrangements | |
| List | Saved Lists of Items |
| Search | Saved Search Profiles |
| dbs | Internally used major database indexes |
| ndx | Internally used short indexes |
How you create a file depends a great deal on the type of file you are creating. In Windows the most common way to create a file is by using the save command on a program's File menu.
To create a file using INTERFACE™ list click
![]() to open the File menu and move your
mouse down to Save
Column Arrangement
to open the File menu and move your
mouse down to Save
Column Arrangement
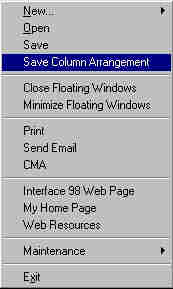
For the purposes of this example it doesn't really matter what kind of file we create, but we will choose a Column Arrangement. Click on Save Column Arrangement and the Save Columns As... window will appear and it will look like this.
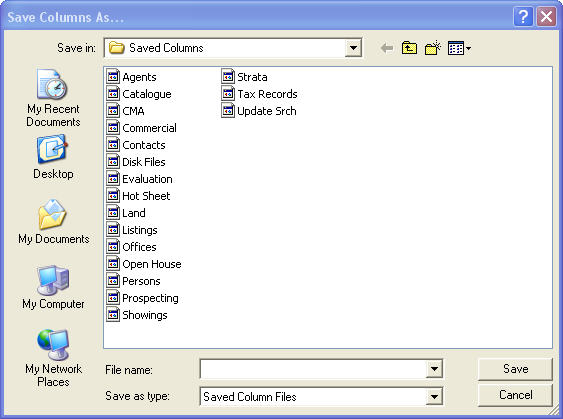
The Save Column As... window is a standard File - Save As Window used throughout
Windows. It allows you to give a name to the file you are about to create on your hard drive and to specify exactly where you are going to put
it. Generally when you are saving something from INTERFACE™ it will automatically open
the correct folder. To see where the file is being created click the
![]() button beside
button beside
![]() , and a drop down list will appear
like this:
, and a drop down list will appear
like this:
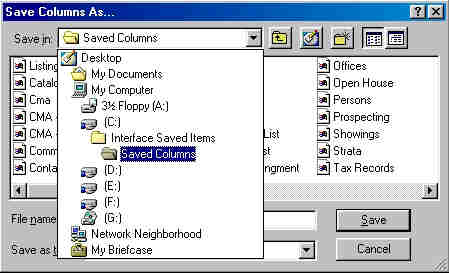
If necessary vertically scroll the drop down list so you can see Desktop. Remember in DOS and Windows, the folders on your hard drive are arranged in a hierarchy. You can see that INTERFACE™ would like to put the file we are creating into the C:\Interface_Saved_Items\Saved_Columns folder. That is where saved columns belong. In this example we are going to change folders, so we learn how that works. Ordinarily we would not have to do that.
Click somewhere outside of the drop down list to close the drop down list. Then click the
![]()
button near the top right of the Save Column
As... window, to move up one level in the hierarchy or folders. Your
Save Column As... window will now
be looking in the C:\Interface_Saved_Items folder instead of the
C:\Interface_Saved_Items\Saved_Columns folder. Click the
![]() button again so you are
looking in the C:\ folder. (Sometimes referred to as the Root Directory or C:\
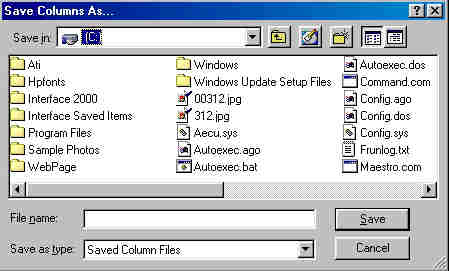
Drive). You will see all of the folders on your C:\ drive displayed in the
center of your Save Column As... Window, something like this:
button again so you are
looking in the C:\ folder. (Sometimes referred to as the Root Directory or C:\
Drive). You will see all of the folders on your C:\ drive displayed in the
center of your Save Column As... Window, something like this:
We want to find the
![]() folder
to continue our example. That is made easier by the fact that the folders are all arranged
alphabetically. However, if you have a lot of folders on your C: drive (like I do) you
will have to scroll horizontally to find
folder
to continue our example. That is made easier by the fact that the folders are all arranged
alphabetically. However, if you have a lot of folders on your C: drive (like I do) you
will have to scroll horizontally to find
![]() .
.
![]()
When you find ![]() click it
once so it is highlighted like this
click it
once so it is highlighted like this
![]() and then click the
and then click the
![]() button. Now we are looking in the
C:\Interface_ 2000 folder. This
is where we will create our new file by saving our Column Arrangement:
button. Now we are looking in the
C:\Interface_ 2000 folder. This
is where we will create our new file by saving our Column Arrangement:
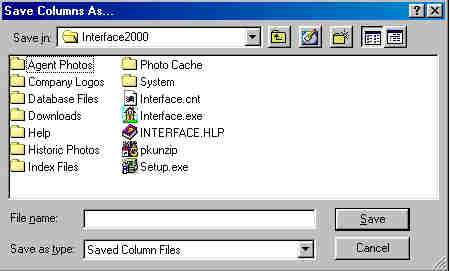
The next step is to give a name to the file we are creating. Beside
![]() you will see a white box with a
flashing vertical cursor. In that box type the name you wish to use for your new file.
This name must be different from the names of all other files in your C:\Interface_ 2000 folder as
shown in the list in the Save Columns As... window. For our example we will type the file
name TEST.
you will see a white box with a
flashing vertical cursor. In that box type the name you wish to use for your new file.
This name must be different from the names of all other files in your C:\Interface_ 2000 folder as
shown in the list in the Save Columns As... window. For our example we will type the file
name TEST.
Then click the ![]() button. A new
file named TEST has now been created in your C:\Interface_ 2000 folder.
button. A new
file named TEST has now been created in your C:\Interface_ 2000 folder.
Open Windows Explorer and find the file. Then delete it.